20% OFF ALL GIFTS THIS MOTHER'S DAY | USE CODE: MOTHER | ENDS IN 02:21:16:11 SHOP NOW

Meet Freya

with FREYA BRAMBLE-CARTER

Lesson 1 of 9

Meet Freya - Video thumbnail
Create free account

This lesson is free to watch

Access all courses
$30 /month

Access 54+ courses, billed annually

Subscribe Now
Buy this course
$107 one-time

Lifetime access to this course

Buy Course

Already a member? Sign in

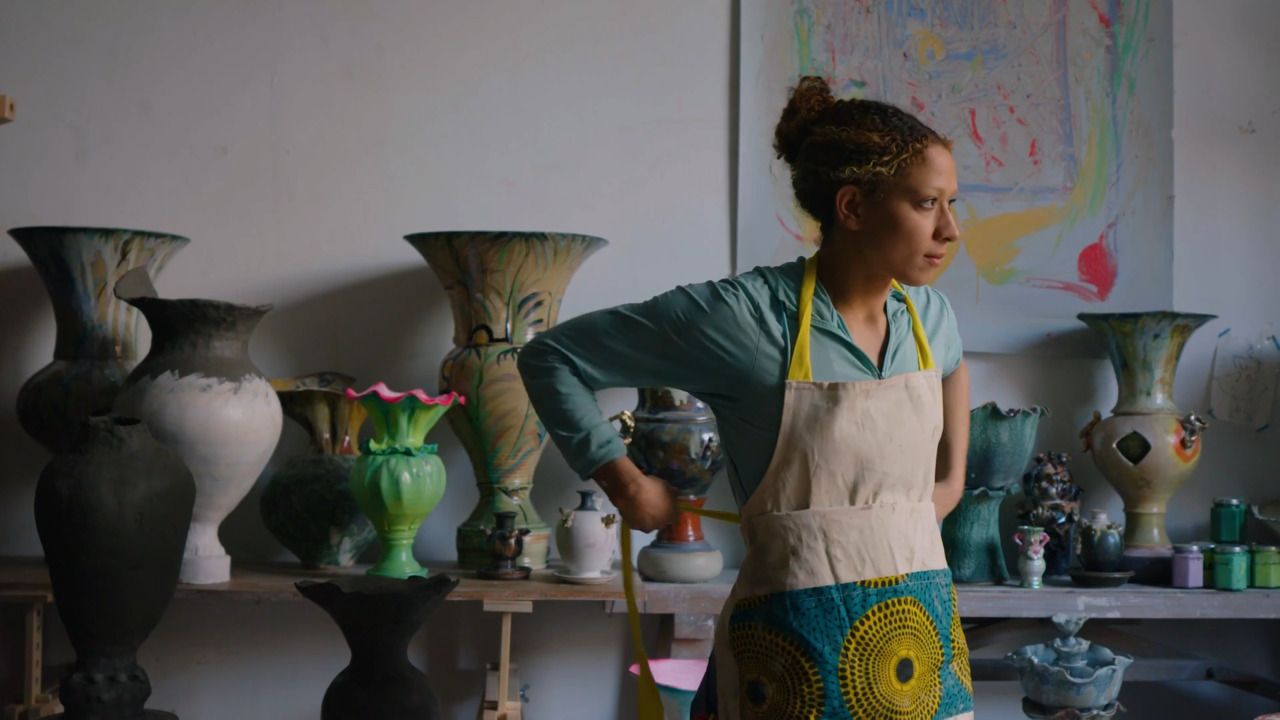
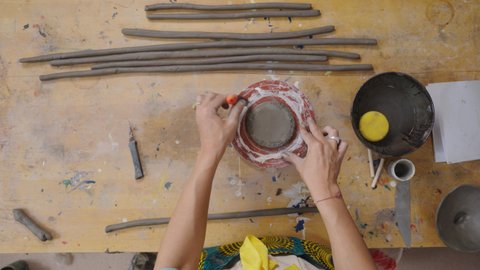
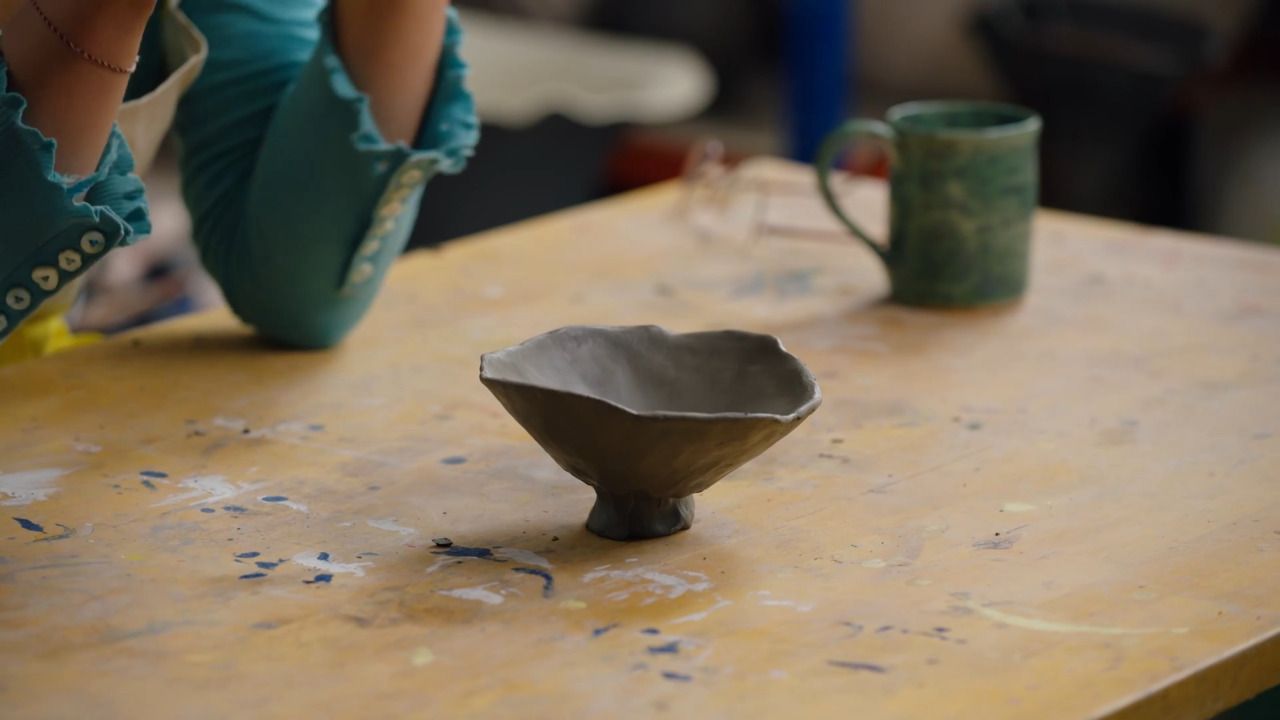
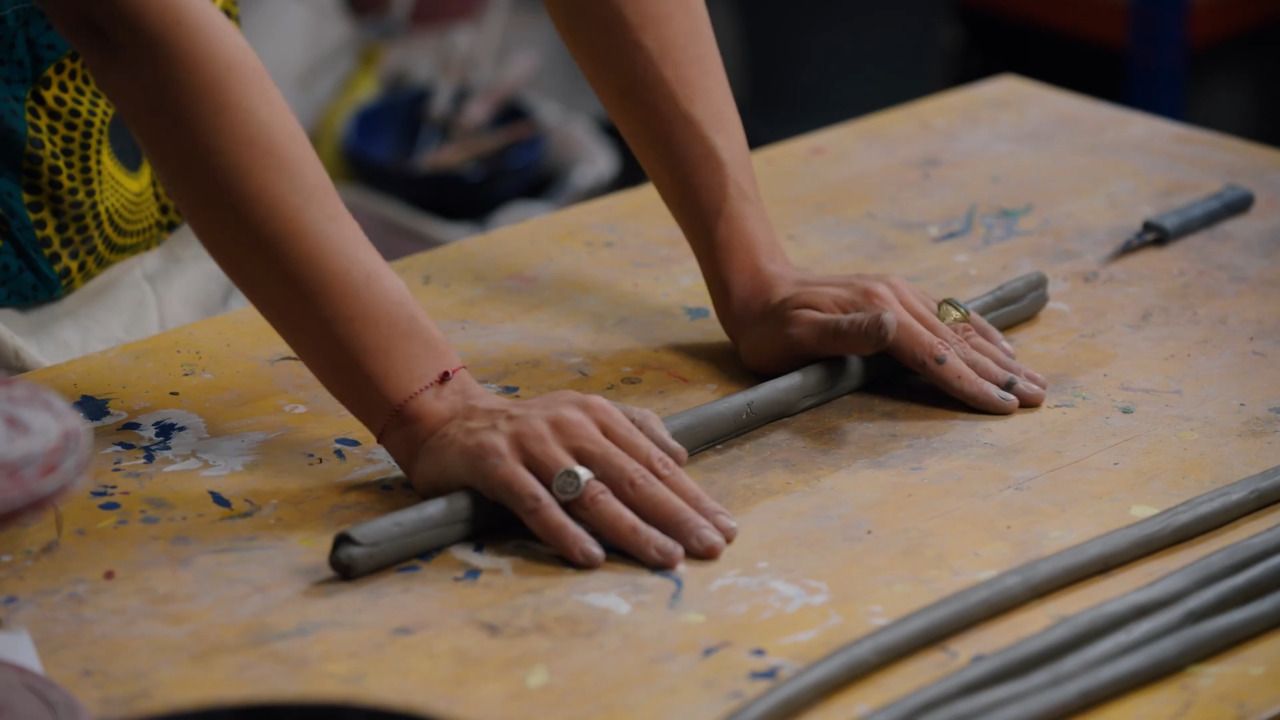
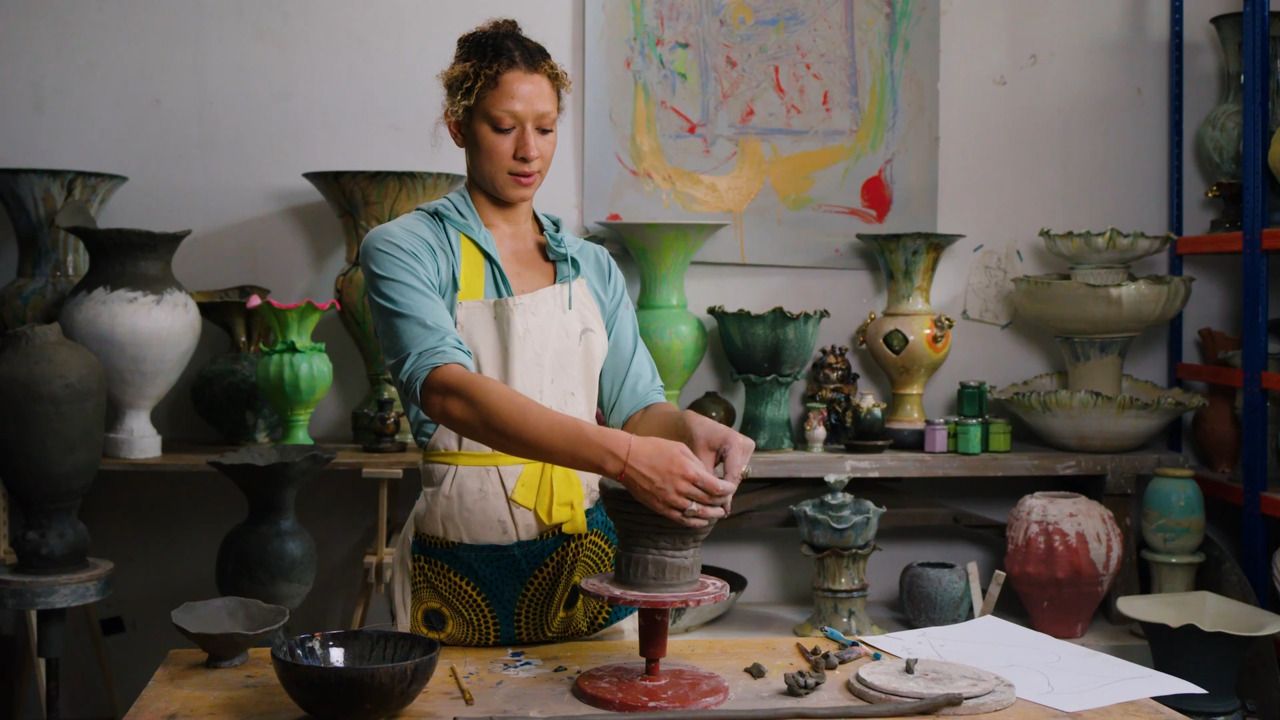
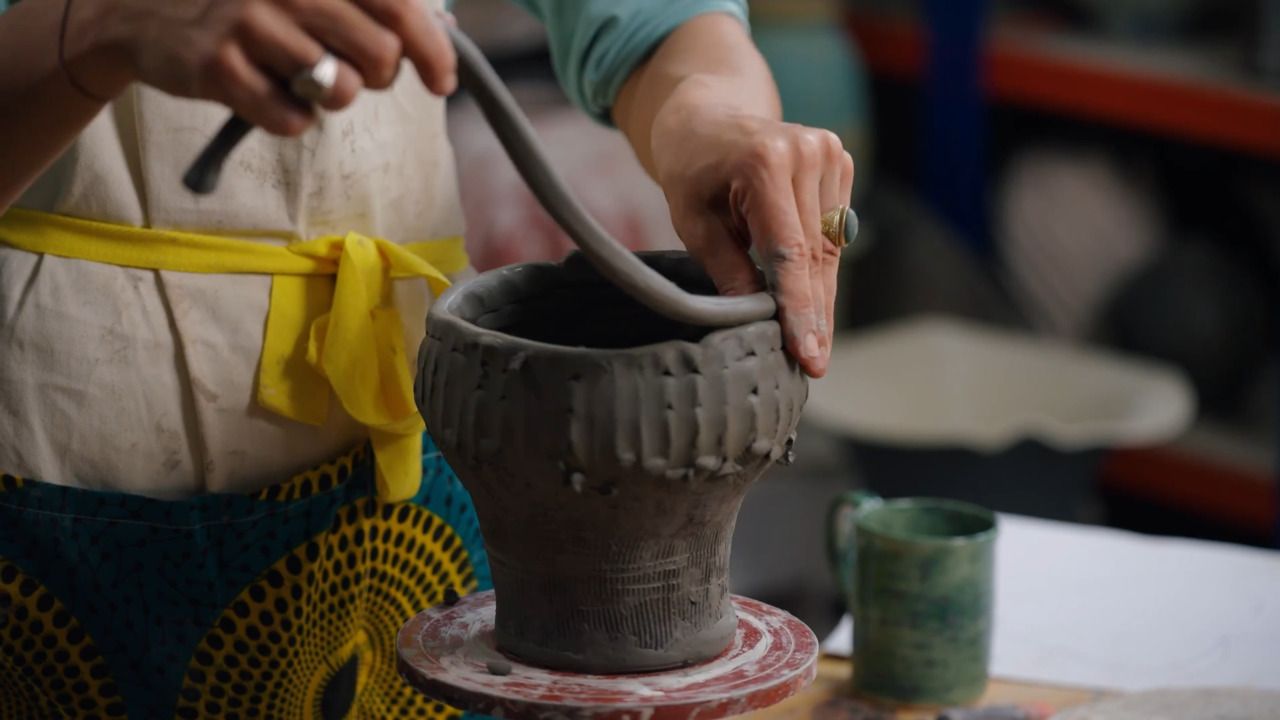
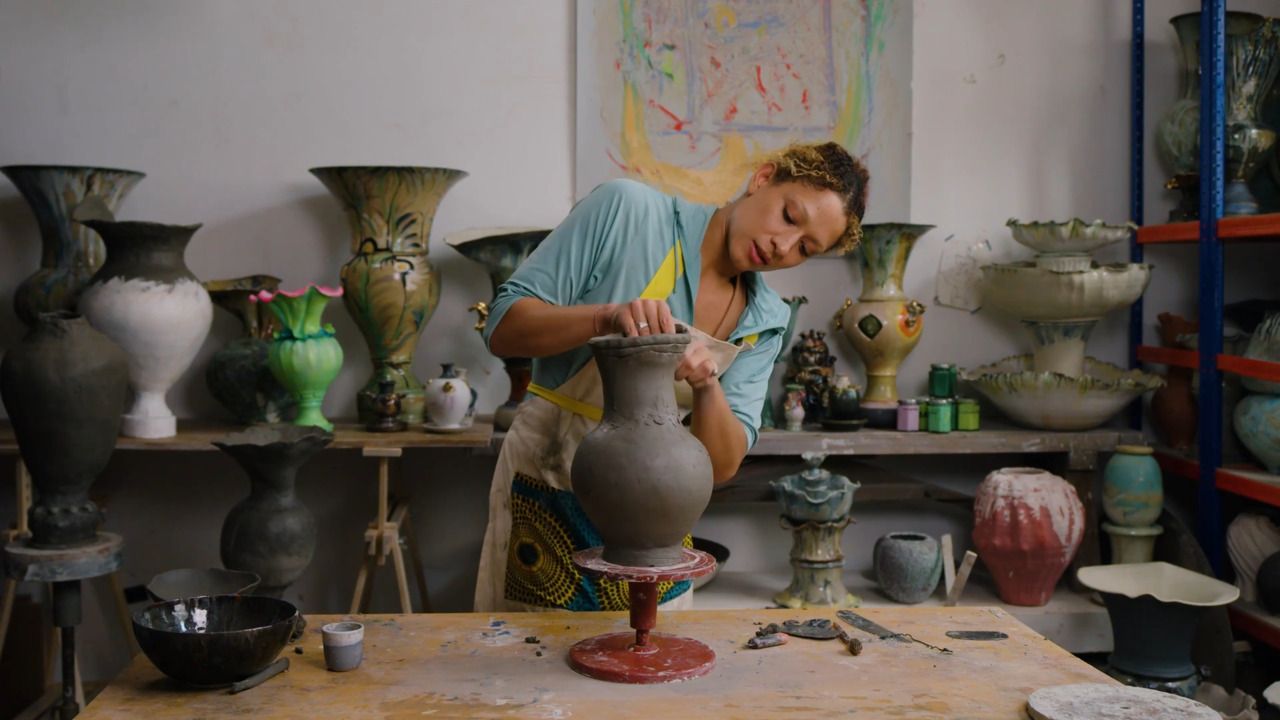
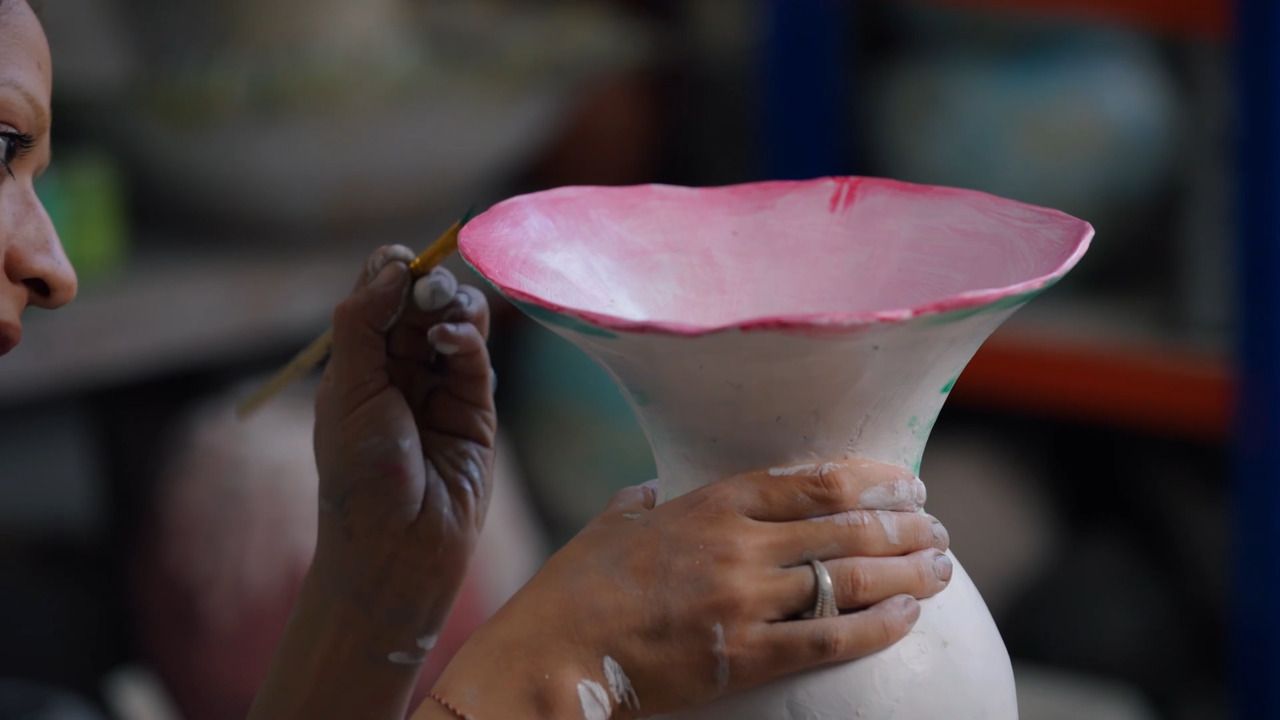
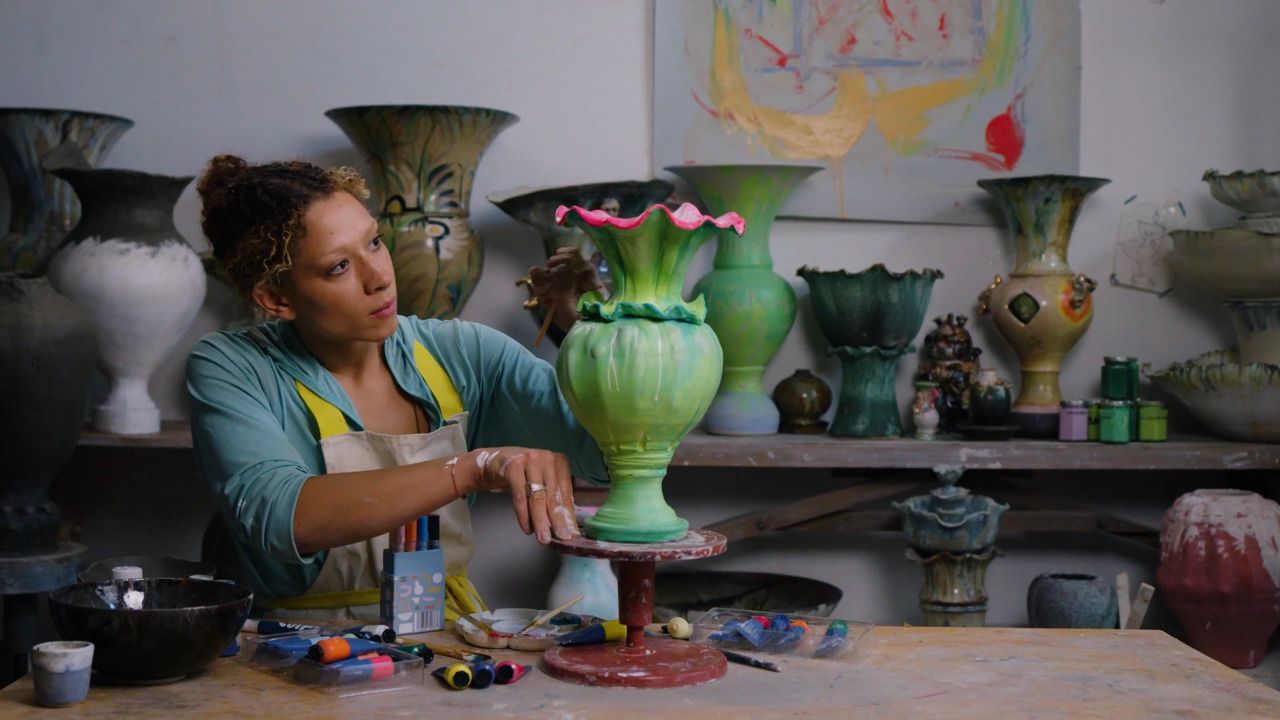
In this opening lesson, Freya introduces her creative world of hand built pottery, sharing her background, influences, and passion for clay. Learners will discover what makes clay such a powerful and expressive medium and get an overview of the vase they’ll create throughout the course. It’s an inspiring start that sets the tone for a soulful, tactile journey into ceramics.

From the Lesson Workbook

Glossary

Clay

A natural, earthy material made of fine minerals that becomes malleable when wet and hardens when dry or fired.

Hand-building

A pottery technique using only the hands and simple tools, without a wheel, to shape clay into forms.

Coil Building

A method where long, rope-like rolls of clay are stacked and joined to build up the walls of a vessel.

Pinch Pot

A basic form made by pressing the thumb into a clay ball and pinching the walls into shape with fingers.

Air-dry Clay

Clay that hardens without firing; ideal for home use, but not waterproof unless sealed.

Slab

A flat piece of clay rolled to even thickness, often used as a base or structural element in hand-building.

Base

The bottom surface of a pot or sculpture, usually rolled as a slab to support the rest of the form.

Score and Slip

Technique for joining clay parts: scoring (scratching) the surfaces and adding slip (watery clay) as glue.

Slip

A creamy mixture of clay and water used to bond pieces or for decoration.

Leather-hard

Clay that's partially dried—firm and ideal for refining shapes or adding detail, but not brittle yet.

Bone-dry

Fully dried clay before firing; extremely fragile and no longer workable.

Firing

The process of heating clay in a kiln to harden it permanently. Not required for air-dry clay projects.

Earthenware

A type of clay that fires at lower temperatures and remains porous unless glazed.

Stoneware

A dense, durable clay body that's fired at higher temperatures and becomes non-porous.

Vitrification

The process during firing where clay becomes glass-like and waterproof, typical of stoneware.

Kidney Tool

A curved pottery tool (often metal or rubber) used for smoothing, shaping, or scraping clay surfaces.

Serrated Kidney Tool

A rib tool with a jagged edge, used to score or texture the clay and remove unevenness.

Template

A cut-out profile guide used to help shape and check the symmetry or design of a piece while building.

Turntable

A rotating surface (like a banding wheel) used to spin clay pieces for easier access while working.

Burnishing

Polishing the surface of clay using a smooth tool or sponge to create a sheen before it's dry.

Introduction

Meet Freya Bramble-Carter

Freya is a ceramicist based in East London. She studied fine art at Chelsea College of Arts while also learning the craft of clay under the guidance of her father, Chris Bramble, a ceramic artist and teacher with over 30 years of experience with whom she shares studio space at Kingsgate Workshops in London. Freya creates tableware as well as larger sculptural vases. Her work incorporates contemporary designs, strongly inspired by the ethos of beauty and nature.

You Will Need

  • Air-dry clay - I'm using Scola nylon reinforced
  • Sculpd also has lots of air-dry clay options
  • Acrylic paints
  • A tea towel, an old sheet, or some cardboard/newspaper to roll on
  • A rolling pin (if you don't want to use your hands)
  • Measuring guides (sticks or books work fine)
  • A knife or a lid to cut out your base shape
  • A damp sponge
  • A turntable - there are cheaper versions available on Amazon, (or you can use a makeshift version, like a folded newspaper or a chopping board)
  • Smooth kidney
  • Serrated kidney
  • For a set of different kidneys and a cross hatching tool: scraper & smoother tool set
  • A plastic bag - to keep the surface pliable when leaving clay to rest & dry
  • Gloss or matte varnish
  • Galeria gloss varnish - Windsor & Newton
  • Scupld paint pens - for adding detail

In this first lesson, I'll introduce you to my world of hand built pottery. You'll learn a bit about me, my journey with clay, and what we'll be creating together in this course. I'll also explain why I love coil building and why clay is such a powerful and transformative material.

Hello, I'm Freya

  • I'm an artist who uses clay to express ideas, feelings and the deeper wisdom of life.
  • I've been working with clay for over a decade and teaching it for just as long - initially in my dad's studio, where I learnt everything from a young age.
  • For me, clay is intuitive and deeply healing. I love sharing this tactile, soulful craft with others.

Why I Love Clay

  • Clay starts as stone, millennia-old and rich with memory. That sense of history and transformation fascinates me.
  • It's tangible, responsive, and grounding. You do something, and it responds - it's an immediate feedback loop, which really helped me learn and focus as someone who's neurodiverse.
  • The act of shaping clay with your hands can feel like a moving meditation. It's a bit like giving yourself a massage with every squish and roll.

Clay holds our imprint - it's memory in motion. Working with it is a conversation between your body, your emotions, and the earth.

Mistakes Are Magic

  • Don't worry about messing up. In fact, welcome it.
  • Mistakes are great teachers. They push your creativity in unexpected ways.
  • Some of my best pieces came from something going 'wrong'. The clay teaches you to be flexible and playful.

Honestly, half my work probably started out as a mistake - but that's the beauty of it. Just dive in. There's nothing to lose.

What We'll Be Making

  • We're going to create a hand-built coil vase using air-dry clay - no kiln needed.
  • If you do want to fire your work, I'll talk you through that too, but everything in this course can be done at home.
  • We'll also use acrylic paints and varnish to finish the piece.

About Coil Building

  • Coil building is one of the most fundamental pottery techniques - great for beginners but endlessly versatile.
  • You make long rolls (coils) of clay and stack them to build your form.
  • You can shape your piece however you like - symmetrical, wavy, sculptural, precise - it's entirely up to you.
  • This is all hand built, no wheel necessary. A turntable helps, but isn't essential.
  • The beauty of coil building is in how flexible and adaptable it is - you can work slow and steady, or fast and free.

It's accessible, meditative, and deeply creative. Clay doesn't judge - it just invites you to show up and play.

Creating a Pinch Bowl

In this lesson, we're getting stuck into clay with one of the most basic and instinctive techniques - making a pinch bowl. This is a great warm-up exercise and an essential skill to build your confidence and hand strength. No tools needed - just your hands and a ball of clay.

You Will Need

  • Air-dry clay - I'm using Scala nylon reinforced
  • Sculpd also has lots of air-dry clay options

Other suppliers

  • Bath Potters
  • CTM supplies
  • Scarva

Let's Begin

  • Grab a handful of air-dry clay - roughly the size of your palm.
  • Give it a good squidge to warm up your hands and get a feel for the texture.
  • Let your hands sink into the clay and enjoy the sensation - it's grounding, soothing and really satisfying.
  • If you've got a cheese wire, you can use it to cut clay from your block more cleanly.

Clay has a beautiful way of absorbing tension. Just squeezing it can feel like letting go of stress - it's like a mini therapy session for your hands.

Making the Ball

  1. Knead the clay lightly by hand - this helps condition it for shaping.
  2. Roll it into a ball, either in your palms or by gently patting the sides.
  3. Try to make it roughly round, but don't worry too much - this is a warm-up, not a masterpiece.

Pinching the Bowl

  1. Press your thumb into the centre of the ball, about 1cm from the base - don't go all the way through!
  2. Now start the pinching:
  • Use your thumb and fingers to gently pinch the clay outward.
  • Rotate the clay in your other hand as you go.
  • Use small, even pinches to avoid thin or weak areas.
  1. As the shape starts to form:
  • Keep turning and pinching gradually upwards.
  • Use your fingers to smooth the inside as you go; stroking the clay helps even out the walls.

Your fingers are your number one tools. There's no right or wrong - just learning how your hands move and how the clay responds.

Shaping and Exploring

  1. Let the bowl shape emerge naturally - observe what it wants to become.
  2. If there's extra thickness at the base, shape it into a little foot.
  3. Let your imagination guide the form - it could be round, flared, wobbly, or something unexpected.

Don't overwork it - if the clay starts feeling floppy, let it rest and dry slightly before continuing.

Top Tips

  • Take breaks as needed - wet clay sags if pushed too far, too soon.
  • Once the clay is stiffer, you can build on it, add coils, or refine the shape further.
  • You can stop here, or come back to this piece later and evolve it into something else.

This is all part of learning to understand clay and yourself. It's about building the connection between your fingers, your ideas and the material. That takes time, patience - and play.

Have fun with your pinch bowl! Even if it's a bit lumpy or uneven, it's your first proper conversation with the clay. Next time, we'll get into the magic of coil building and begin sculpting the base of your vase.

Designing Your Vase

Before we dive into building, let's take a moment to visualise your vase. It's a great way to give your making process some intention, though, don't worry if the design evolves as you go. That's part of the magic.

Visualising Your Vessel

Start by asking yourself:

  • what shape reflects you?
  • do you want your vase to be tall and elegant, or short and bold?
  • will it be symmetrical, or have a lovely wobble to it?
  • what colours speak to you? What textures?
  • will you add decorative elements - like a flowered rim, marks, or brushwork?

Freya's Inspiration

For this lesson, I'm inspired by sunlight and flowers. I want my vase to open wide at the top like petals greeting the sun. It'll taper down into a rounded, curvy body and have a narrower, sturdy foot - because we all know I've made a few wobbly bottoms in my time!

Colour-wise, I'm thinking of soft pinks and greens, maybe with white to lighten and shift the tones across the body, creating something that feels radiant and alive.

I always think of the vase as a self-portrait - what energy do you want to hold and express through this form?

Sketch It Out

Take a moment to do a quick sketch or colour wash:

  • use the acrylic paints you'll be working with later to try out tones and combinations
  • it doesn't need to be perfect - just a simple visual to guide you
  • if you change your mind halfway through building, that's totally okay. Adaptation is part of creativity.

Make a Template (optional)

If you want a bit of structure while you build:

  • fold your sketch in half vertically (this works well if your vase is symmetrical)
  • cut out one side to create a profile stencil
  • this can act as a guide - you'll hold it up to your vase as you build, checking the shape from the side.

If your shape is more abstract or freeform, skip the stencil and just follow your instincts.

Use the template if you need it - but if you're feeling bold, let your hands lead. There's no wrong way.

Now that you've got a sense of what you're making, we'll begin the actual build in the next lesson, starting from the base and working up with coils. See you there!

Building Your Vase

The Base & Coils

Right, let's get our hands into the clay and start building the base of our vase, and then move on to rolling and stacking coils. This is where things get really tactile and fun.

You Will Need

  • A tea towel, an old sheet, or some cardboard/newspaper to roll on
  • Measuring guides (sticks or books work fine)
  • A knife or a lid to cut out your base shape
  • A turntable (cheaper versions available on Amazon) (or a makeshift version, like a folded newspaper or a chopping board)

Rolling the Base

To begin, we're going to roll out a flat slab of clay for the bottom of the vase.

Steps:

  1. place your clay on the fabric or surface
  2. put your measuring guides on either side, and roll your clay between them to get an even thickness
  3. cut your base shape. It can be round, oval, or completely unique - use a lid, stencil, or trace it freehand with your finger and a knife.

It doesn't have to be perfect. The imperfections are part of your imprint.

Place your base on a surface that's easy to move (like wood or thick card) so you can turn it easily as you build.

Understanding Clay Types

The type of clay you're using matters, especially if you're firing it. This is what you should know:

  • check the firing temperature (earthenware is lower, stoneware is higher)
  • look at the texture - is it smooth or gritty?
  • is it air-dry, or does it need to be fired in a kiln?

Always tell the person firing your piece what kind of clay it is - otherwise, it might melt or explode. Not ideal.

The clay I'm using has little fibres in it, which helps make it strong, even when bone dry. It can be fired to either earthenware (1180°C) or stoneware temperatures (between 1200°C and 1300°C), and I tend to fire my work to stoneware for that lovely, vitrified finish.

Making Your Coils

Now we move on to rolling coils - these are the building blocks of your vase walls.

How to roll a coil:

  1. grab a chunk of clay, give it a good squidge (technical term)
  2. roll it between your palms first, then on the table
  3. use the whole length of your hands, starting in the centre and stretching outward.

You're aiming for coils about the thickness of your finger. Too thin, and your walls may collapse. Too uneven, and you'll have weak spots.

The trick is to be gentle. If you're too rough and it goes thin, start again. No drama.

Make 4-5 coils to begin with. They'll dry quickly, so keep an eye on the texture. You can use slightly stiffer coils at the bottom of your build to give extra stability.

Tips for Success

  • Let the clay dry in stages if you're building tall - it can't hold itself up if it's too soft.
  • Avoid air pockets - press and roll carefully.
  • Be mindful of moisture - it affects strength.
  • If you're planning to fire your piece, handle the clay thoughtfully. No random re-rolling or trapped air.

The Power of Clay

Working with clay is deeply meditative. It absorbs you, mirrors you. It's a dance, a conversation between you and this ancient material. This clay, even processed, still holds the memory of stone, formed over millions of years. You feel that when you work with it. You're holding a bit of the earth's story in your hands.

It's before your time, before mine. That's the real gift of it.

In the next lesson, we'll start building upwards with coils - joining them to the base and shaping the form. Bring your attention and curiosity. Let's go slow and steady.

The Coiling Technique

Now that we've got our base and coils ready, it's time to start the real building - layer by layer, we'll shape our pot by joining coils and blending them as we go. This is the heart of hand building with clay, and one of my favourite parts of the process.

You Will Need

  • Smooth kidney
  • Serrated kidney
  • For a set of different kidneys and a cross hatching tool: scraper & smoother tool set

Starting with a Strong Foundation

We begin by attaching the first coil to the base. I always use my firmest coil for this - like the trunk of a tree, it needs strength to support everything above.

How to stick it on properly:

  1. score (or cross-hatch) the top of the base and the bottom of your coil using a fork, knife, pin, or toothbrush
  2. add water to those scratched areas - this activates the clay's surface
  3. mix water and clay to create a gluey texture known as slip - this helps the two parts fuse as they dry.

Cross-hatching locks the textures together. Water is the magic that binds them.

Make sure the base and first coil are firmly joined - press it on so you can hear little air bubbles escape. That's a good sign, it's bonding well.

Building the Walls

As you stack the coils:

  1. use your thumb on the inside to push the new coil down and slightly blend it into the one below
  2. keep your other hand on the outside to support the shape as it grows
  3. if a coil feels dry, add a dab of water - not too much! You want it to feel tacky, not slippery.

You'll notice a rhythm forming: score, moisten, press, blend.

It's a gentle push and roll - not thinning the coil, just locking it in.

Shaping as You Go

This is the stage where your form starts to emerge. I wanted mine to flare out gently, so I leaned my coils slightly outward as I went.

You can:

  1. build up all the way around in one go for fluid, organic forms
  2. or take it slow, one ring at a time, blending each one in completely for a more symmetrical, structured shape.

Both methods work - it just depends on your style and patience!

Some of the best coil builders I know do one ring at a time - it's meditative, slow, and stunning.

Blending and Smoothing

Once you've stacked a few coils:

  1. use your thumbs and fingers to blend and smooth inside and out
  2. then, try a serrated kidney tool to even out any lumps. It's like combing the clay - gives a consistent texture, ready for final smoothing later.

If your pot is starting to curve or flare, pause to let it firm up before adding more coils. This helps it hold its shape and stops it from slumping.

Don't Forget Your Body

Posture matters! As you build:

  • make sure your neck and spine are supported - you might need a higher table or chair
  • listen to your body - this is slow craft, not a rush job.

The Philosophy Bit

There's something about this process that feels ancient. Coiling connects you to clay in such a primal way - one ring at a time, you're creating a form that holds space, maybe even memory. The act of joining, layer by layer, is like building a story.

Every pot has it's own pace - trust yours.

Next time, we'll look at smoothing and refining the shape, and how to plan your form if you want to change direction mid-build. For now, take it slow, feel your clay, and enjoy this rhythm.

Building the Body of the Vase

This is where our pot really starts to take shape - we're not just coiling now, we're sculpting a form, considering proportions and how the piece moves through space. It's about tuning in to both your clay and your creative intention.

Thinking About Form

At this stage, I'm reaching the widest point of my vase - the belly. It's a good time to think about the overall profile.

  • How wide is the belly compared to the base?
  • How will it taper into the neck?

These ratios matter. A narrower base and wide belly can be beautiful, but they're also more likely to collapse - so I tend to pull in the form a little sooner to keep it stable.

A little tip: you can sketch your shape first or even cut a cardboard stencil form to guide your profile as you build.

The Versatility of Coiling

Coiling is such a universal technique - I've used it to make all sorts: toilets, sculptures, cutlery! It's perfect for dynamic forms and allows for height, play, and layering other techniques over the top.

It's also one of the first hand-building methods most people learn. There's something intuitive and grounding about it.

Checking the Profile

I pause often to step back and look at the shape from a distance. A quick trip to the loo and fresh eyes can reveal if things are going off-course!

Keep checking:

  • is it leaning?
  • are you flaring out too soon?
  • is the profile what you imagined?

Every time you return to your pot, you see it differently - use that to guide your decisions.

Flat Coils for Speed

If you're short on time, try making flatter, wider coils. They build height faster and help you cover more ground.

  • Flatten them with your hand or a rolling pin.
  • Watch for thin spots - break them off if they're too delicate.

I used a few here to speed things up. They're also great for adding structure and variety to the build.

Refining as You Go

As I built, I kept sculpting the coils to shape the belly and waist of the vase. Once I'd formed the general silhouette:

  • I blended the coils, using fingers and thumbs to smooth transitions
  • then I went over it with a serrated kidney, combing from bottom to top for evenness.

After combing, I switch to a smooth kidney - mine's a favourite soft one from Mud Tools - to polish the surface.

You can also stretch or refine the form from the inside using your knuckles or fingers. Be gentle - you're thinning the clay as you do this.

Push from within, but always listen to the resistance.

Timing and Texture

If you've taken a break, check your pot's moisture levels. The older coils will have firmed up. To blend fresh ones:

  • add a bit of moisture
  • really work the new clay down into the older layers.

Let the piece rest and dry once you're happy with the shape. I usually leave it for 30 minutes to an hour before adding more height.

If you leave it longer, cover it with a plastic bag to keep the surface pliable - especially important if your studio's warm or dry.

Timing is everything with clay - not too soft, not too dry.

A Note on Symmetry

If perfect symmetry is your goal, wheel-throwing might be your best bet. Coiling is more intuitive, slower, and personal. For me, the slight irregularities are what make it beautiful.

I want the human hand to show. That's the poetry in pottery.

Let the form guide you. Let your hands respond. Next time, we'll build the neck and refine the rim - the final flourish before drying and firing.

How to Store Your Unused Clay

To keep your unused clay from drying out and becoming too hard to work with, make sure to store it properly. You can either seal the bag with a clip or metal clasp, or—as I often do—twist the top of the bag, tuck it underneath, and store the bag upside down to keep air from getting in.

Forming the Neck

We're entering the final stretch of our vase-building and shaping the neck. It's where your piece starts to speak, to express its energy and character. Now's the time to infuse your pot with meaning and movement.

Preparing to Build Again

After a break, I always check the moisture level of the top coil. If it's gone a bit stiff (heading into leather-hard), I soften it before adding more coils:

  • use a toothbrush and water to make it tacky
  • if it's too dry, score it a little and add more water to help the new clay stick.

Before closing off the neck, check your shape one last time. Now that the clay is firmer, you can apply more pressure to stretch or adjust without it collapsing. I often use my knuckle on the inside to do this.

Refining the Shape

This is a great moment to refine the profile:

  • step back and look at it from different angles
  • push areas out or in using a rubber kidney, spoon, or even your finger
  • you can get it beautifully symmetrical at this stage if that's your goal.

I think of this stage as a gentle combing-through - your tools, your fingers, your presence slowly refining the clay. If done with care, it can look as if the pot's been thrown on a wheel.

Building the Neck

Time to go up. You can:

  • add coils for height
  • begin to flare it out at the top if you want a wide, open mouth.

Important: Make sure the base of the neck is firm and thick enough. This area and just below it are prone to collapsing if they're too soft or thin.

When adding water, use just enough - too much and it'll drip down and weaken areas you want to stay strong. Keep the neck tall and expressive, and let the form flow naturally.

Expression Through Form

This is where the meaning comes in. For me, this open neck symbolises:

  • reaching up to the sun
  • channelling energy down into the body of the pot
  • a sense of growth, expansion, and openness.

But your form might do something else entirely:

  • curve inward like a bud
  • wave slightly to one side
  • spiral or twist.

Let your personality come through. Allow for little imbalances and imperfections. They make the piece more alive.

Clay forgives. If something collapses a bit, don't panic - reshape, resmooth, keep going.

A Moment of Reflection

As you finish shaping, think about this:

  • your hands, heart, and mind are all in the clay
  • the process is as valuable as the product.

Clay reminds me that we can reshape life - soften what's stiff, rebuild what's collapsed, and keep forming something beautiful.

This coiling technique is as powerful for beginners as it is for experienced potters. The more you practise, the more your ideas and your skills develop together. There's always more to discover.

At this point, I'll let the pot dry a little before finishing the top. I might add a few final coils, smooth it out, and next, we'll start to decorate and paint.

Decorating & Finishing

Painting Your Vase

Now we get to paint! This part's all about play, creativity and personality. You're turning your clay vessel into a piece of art that reflects you - your imagination, your colours, your energy. It's where it all comes alive.

You Will Need

  • Smooth kidney
  • Acrylic paints
  • Gloss or matte varnish
  • Galeria gloss varnish
  • Paint pens

Surface Prep

At this point, your vase should be leather hard - firm but not bone dry. It should feel like hard cheese - you can press your nail in, but it holds its shape. This is the ideal stage for:

  • smoothing with a metal or rubber kidney
  • filling holes or cracks with soft clay and a little water
  • adding sculptural decoration (if you want raised details).

If you want a super smooth, polished finish, take your time here. Use a damp sponge, metal scraper, or even a spoon to burnish and soften the surface.

The Painting Process

We're using acrylic paint for this. You don't need a kiln or glaze - this method works for those making at home with air-dry or non-fired clay.

Here's how I paint

  1. Base layer: A full coat of white acrylic - this helps the colours pop and adds a first layer of sealant.
  2. Coloured layers: Paint your design in layers. I use light colours first, then layer darker ones over.
  3. Varnish: Apply a few coats of gloss or matte varnish to waterproof your vase. It's essential if you plan to put water in it.

The paint becomes your glaze, your design, and your protection all at once.

You can get creative here - there are loads of brilliant paint pens and tools out there too.

Tips for waterproofing:

  • paint the inside and the base - these are easy to forget
  • use multiple varnish coats if you want to hold water inside the pot
  • let each layer dry completely before adding another.

Acrylic dries fast, so it's great for blending if you work quickly - use a bit of water to help smooth transitions or make a wash.

Colour and Flow

When I paint, I let the form lead the flow of the colour. For example:

  • I might give the rim a darker tone to frame the vase - it's like the "mouth" of the piece
  • I'll let the colour move around the curves - darker in some spots, lighter in others.

Follow the shape. Let the paint dance with the form.

You can be bold or subtle - it's your call. For this vase, I'm blending red into pink inside, and then fading through greens and blues on the outside - soft, organic, nature-inspired.

No Rules, Just Joy

This stage is intuitive and forgiving:

  • don't be afraid to make mistakes - you can always paint over it
  • let your imagination guide you. Play with tone, pattern, and texture
  • this is your opportunity to express your story, your taste, your vibe.

I'll finish my vase with some highlighting and maybe draw on leaf-like veins or floral lines with my favourite paint pens. You can go as minimal or as decorative as you like.

Let it all dry fully before moving or filling it. And then, you've got your finished, hand-built, hand-painted, completely personal vase.

Adding the Finishing Touches

We've made it to the final touches! This is where everything comes together - colour, form, feeling. I'm just refining a vase I made earlier with a more elaborate design - it's a bit floral, a bit pumpkin or strawberry-like, with these little sculpted ridges and petals. Whatever you've made, now's your moment to bring out its character and seal in all your hard work.

You Will Need

  • Acrylic paints
  • Gloss or matte varnish
  • Galeria gloss varnish
  • Paint pens

Refining Your Paintwork

Once the first layers of paint are dry, you can go in and:

  • deepen colours - add richness or shadows
  • smooth blends - soften transitions between tones
  • add highlights or extra pops - bring energy and focus.

It's all about adjusting what you've already done. Just take your time and enjoy the process.

Let the vase tell you what it needs. Follow its curves, listen to its shapes.

This is where paint pens can also come in handy - for details, veins, outlines, or playful embellishments.

Sealing with Varnish

This step is key for making your vase watertight and giving it that lovely finished look.

  • Wait a couple of days for your pot to fully dry - this helps avoid peeling when you varnish.
  • Use either gloss or matte varnish - I like Sculpt brand, but anything designed for acrylics will work.
  • Apply a thin layer, let it dry completely, then do another if needed.

Don't forget to varnish:

  • the inside, especially the bottom
  • the outside base
  • every nook and curve.

If you miss the bottom or inside, you might get a soggy pot and a wet shelf - not ideal, but easily avoidable!

Get the full workbook, video lessons, and more with a Create Academy subscription.

Subscribe to access the full workbook
Freya  Bramble-Carter

Your Instructor

Freya Bramble-Carter

Contemporary ceramicist

Freya is a ceramicist based in East London. She studied fine art at Chelsea College of Arts while also learning the craft of clay under the guidance of her father, Chris Bramble, a ceramic artist and teacher with over 30 years of experience with whom she shares studio space at Kingsgate Workshops in London. Freya creates tableware as well as larger sculptural vases. Her work incorporates contemporary designs, strongly inspired by the ethos of beauty and nature.

You May Also Enjoy

Access to all courses

Get access to Unlimited learning with a Create Academy subscription